
My debit card expired the other week. I know, I know...this isn't really the most fascinating of topics ever addressed. However, due to a lucky combination of circumstances (1. I didn't put it into an ATM after it expired, so it didn't get eaten; 2. I tend to take almost anything to pieces), I decided that this was the perfect opportunity to dissect the old card. I'm not certain what I hoped to achieve with this activity, but no matter - it successfully wasted several hours, and hopefully you'll find it entertaining too!
A couple of quick notes before we start. First, this post is full of photos. The files aren't huge, but they do load at 800x600 resolution (I'm using the cheater's version of thumbnailing, I'm afraid), so I'm putting all of them behind the cut. If you're on dialup, you may wish to wait until you've found some broadband, or you might be here some time!
Secondly, for goodness' sake don't try this at home unless a) you're using one of your own cards, b) you are absolutely certain you won't need it any more, and c) you completely destroy it afterwards. Identity theft is a major problem nowadays; you'll be able to see what steps I've taken against it later in the post. If that's all OK, on we go with the dissection!
The only things that you'll need for this operation are:
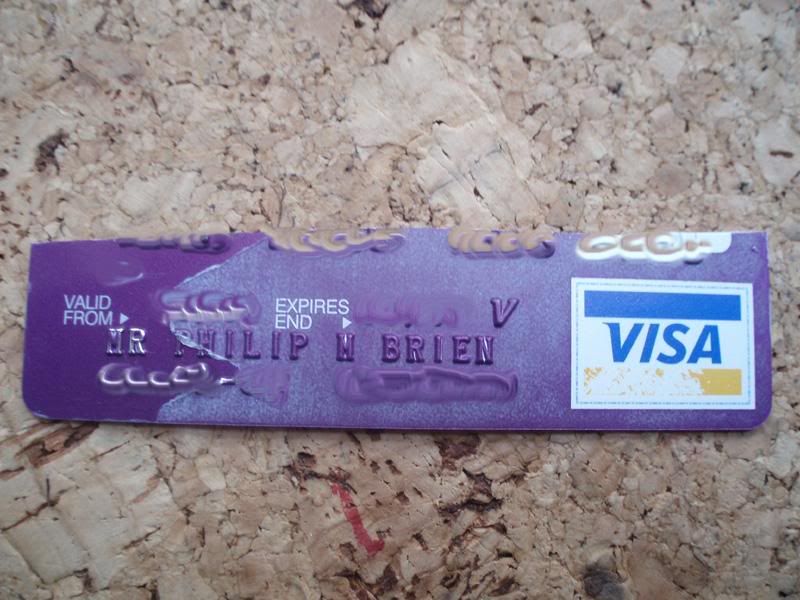
The first thing that I did was to make three horizontal cuts across the card, making sure one of them went through the card number.
This not only helps to make the card number illegible, it also makes it much easier to peel off the card's layers. As far as I can make out, the card is made of at least 7 layers; a central white core, with one hard coloured layer and two layers of transparent film on either side. The two transparent layers are pretty much impossible to separate except by accident, so you can treat them as one; they carry most of the important bits of the card. Specifically, the magnetic strip is part of them, so that's what I tried to remove next.
Scoring a line with the penknife didn't work too well near the edge...
...but it did work right in the middle, making it easy to peel off the magnetic strip in both directions. There was much more resistance at the edges, so I reckon either the glue is stronger there or the layers are sealed more closely.
The text under the strip reads "3 Track HiCo Black Magnetic Tape"; for those who are wondering what that means, scan through the FAQs from Intercard.co.uk. I had no way of reading the contents of the tape itself, but I imagine it holds just the card number.
With the magnetic tape's possibilities exhausted, I moved on to the middle segment of the card, and removed the film carrying the hologram. This produced the only completely unexpected aspect of the card...
There's a bird hiding under the film! It's etched into it somehow, making it entirely invisible until the film is removed; I think it's probably a security measure, as it would be fairly obvious that the card's now been tampered with. That's supported by the fact that the bird looks very much like the one on the hologram. It's also visible on the film itself:
The code numbers under the hologram (0 C E 2) return no meaningful hits in a Google search, so they're probably an internal reference to the type of hologram required.
The next thing to come off the card was the film from the bottom segment:
No great revelations here, although it's interesting to notice what's been removed; most of the Visa logo is intact, but everything silvery has gone. Much of the metallic shimmering effect on the card's surface remained, so that must be part of the coloured layer.
Here's the card with most of the transparent film removed from the front. It looks like there might be something drawn on the top segment...
...but on closer examination I think it got there while I was peeling off the film; it does look rather like a fingerprint. Incidentally, this photo shows more clearly how all the silver colouring has come off with the film; the two layers of film are also apparent.
The last bit of film-peeling took me back to the middle segment, in order to remove the signature strip. This was very much like the magnetic strip, especially in that there was something underneath...
In amongst the "VOID"s (I think it's fairly obvious by now that the card's void for purchases, really) there's a line of text reading "Oberthur C.S.3 89302 12/04". (The same text as appears above the magnetic strip and to the right, in fact...have a look at the third photo in this post.) While this produces no Google hits, there is a company called Oberthur Card Systems. So now we know who made the card; what the "3" means is anyone's guess, as is the "89302 12/04". (I got the card in 2006, and I doubt it was sitting in a warehouse somewhere for two years; it's also not a patent, as US Patent No. 89302 is for an "Improvement in Felt Suspender-End".)
Moving on, then, we come to the chip, of Chip&Pin fame. It popped out of its recess with very little force, leaving nothing behind and remaining remarkably intact.
I find it a little worrying that the chip came out quite so easily; the fact that it's the only component which is obviously glued in also seems strange. The film was held on to the plastic very strongly, so what's stopping the chip from being held in the same way? Anyway, it does mean that we can get a good look at the chip itself. It's very, very tiny, with the vast majority of the recess being taken up by the contacts. Each one of these connects to a gold wire (probably gold, anyway), which in turn connects to the chip.
I peeled off the contacts fairly easily, although the central one was much more troublesome, and in fact left a lot of residue on the chip itself. That made it difficult to see properly, and obviously with something so tiny it's difficult to see any details anyway. Time, then, to dig out my dad's old microscope!
The chip's very blurry because we're looking through the glue, although the wires are clearly visible. I'm not certain whether the little circle is a feature of the chip or merely an air bubble. By zooming in, we can see it more closely (along with some of the chip's surface).
We can also see a close-up of the joint between the chip and the wire...
...and part of the circuit on the chip's surface...
...and the (surprisingly detailed and pretty) surface of the glue...
...and the joint between the wire and the contact pad (or where it used to be, anyway)...
Either there was no joint at all between the contact and the wire (and contact was made through pressure alone), or the contacts were created already attached to the wire. I have no idea how that could have been done.
That's all the dissection that I carried out. The only thing left to do was to provide a bit of scale, so you can see just how tiny the chip is...
Here's the final dissected card with its components around it.
Remember I talked about identity theft at the beginning of the post? Here's where you find out how to avoid it...
Nice and simple!
So what does all of this mean? Well, it's clear that credit and debit cards are certainly very sophisticated little bits of plastic - I was surprised at how many different bits go into them, and how much of the visible detail has clearly been assembled rather than simply printed. The chip, in particular, is a beautiful little piece of engineering, and even things like the glue have unexpected details. On the whole, it's a great demonstration of one of the rules of life, as brought to us by the wonderful xkcd: "You can look at practically any part of anything manmade around you and think 'some engineer was frustrated while designing this.' It's a little human connection."
Tuesday, 6 November 2007
What's in YOUR wallet?


![]()


No comments:
Post a Comment